
I’m talking about antennas of course, in particular HF wire antennas, when you are away from your own QTH.
This was my situation a couple of months before the RSGB AFS SSB contest in January. I can operate from my home QTH where I have half wave 40 / 80m dipoles 12m high but the local noise level makes it challenging to hear the weaker stations especially on 80 during the day. This year however an opportunity arose when my daughter moved to a house in rural Cheshire that has some open land of a size to take long wire antennas. A survey of the grounds identified one or two large trees as candidates to support an antenna. So the next task was to fix a rope, as a halyard for the antenna, as high as possible without resorting to climbing.
My usual technique is to swing a rope, weighted with a small bag of sand the size of a golf ball, in a vertical plane letting go at when 90° before vertical. A few practices are usually needed in open space to get the rotation speed and release point correct before aiming at the chosen branch. While being a simple technique it requires a degree of skill of hand to eye coordination to judge when to release. If all goes well the weight will rise in a smooth arc and sail over the chosen branch and slowly descend allowing the antenna to be attached. Then pull up to branch height leaving end of the antenna clear of leaves and secure the rope around the tree trunk. From my experience heights of 5 to 6m (15 to 20 ft.) can be achieved but success is dependent on the density of the leaves and branches; too dense and the rope can snag limiting its upward travel. The following figures illustrate the sequence and as you can see winter gives a clearer view of the branches.
Higher still?
Now as the trees I mentioned earlier were large 12-20m (40 – 60 ft.) So I looked for alternative ways to get the rope as high as possible. I considered catapults and crossbows but concluded they were unsuitable based on strength to operate and cost. My research led me to some amateur radio sites and a piece of kit called an Antenna Air Launcher. They are very popular in the US where trees are much higher than here.
Air Launchers
An Air Launcher (aka Spud Gun) uses compressed air to fire a projectile into the air. Amateurs have adapted them to attach a lightweight line to the projectile. When fired over a tree a rope is attached to the line and pulled back over and fastened in a loop to be the halyard for an antenna. Dependant on the pressure applied, heights of over 30m (100ft.) can be achieved. The following figures illustrate the sequence.
This caught my attention and further research yielded sites to purchase one ready to use (£200 -£300) and kits to assemble (£100-£200) or in my case make yourself from published plans (£50).
Figure 1 – Commercial Air Launcher WB6ZQZ[i]
[i] Commercial Air Launcher from Alan Biocca Engineering (WB6ZQZ)
https://www.antennalaunchers.com/antlaunching.html
UK Rules and regulations
In the UK an air launcher is categorized as an air weapon. To keep within the law it must comply with the UK Firearms licensing law[i] and Home Office Guidelines[ii]
[i] Firearms licensing law
[ii] AIR WEAPONS:A brief guide to safety https://assets.publishing.service.gov.uk/government/uploads/system/uploads/attachment_data/file/1171973/Air_weapons_safety_leaflet_6-4.pdf
The key points being:
- Must not fire a pellet beyond a boundary of premises
- Must not have an air weapon in a public place without a reasonable excuse
- Must not fire an air weapon without lawful authority or excuse within 50 feet (15 metres) of the centre of a public road
- Must not be used to damage property or endanger life
- The air weapon muzzle velocity must not exceed 12 foot-pounds[i]
- The air weapon muzzle energy must not be more than 1 joule of energy (Guns below this threshold, and qualifying “airsoft” guns, are not regarded as firearms)
[i]Calculations relating to a pneumatic launcher
https://www.physicsforums.com/threads/calculations-relating-to-a-pneumatic-launcher.981365/
Plans
There are many plans available on the internet and the ‘Build-it-yourself air cannon plans’ site[i] is a good starting point. However, most plans I found were based on US sizes and parts which are not readily available here. Also their standards i.e. pipe fittings and solenoid valves are not compatible with UK British Standard Pipe sizes. In the end I designed my own using UK and or eBay suppliers.
[i] Build it yourself air cannon plans
With the levels of air pressure involved it’s very important to use pressure rated PVC tube and adaptors than can stand high pressure. I chose 3mm wall thickness solvent weld material which would stand up to 7 bar (100 psi). The reservoir is 75mm diameter and the barrel 32mm. A Schrader air valve is used to pressure the reservoir. A ¾” BSP gas ball valve fitted with a spring release and wired to a simple trigger. The spring speeds up the valve opening to apply instantaneous pressure on the projectile. The plumbing is completed with brass 3/4“ BSP fittings and gas quality PTFE tape. The projectile is made using two PVC bottle stoppers to seal a short length of 25mm pipe holding a 5g weigh and a loop to attach a fishing line. The reel is held on a bracket off the barrel.
CAUTION: When building pressure vessels of this type it is extremely important to follow best engineering practice. Incorrectly built these launchers can be dangerous!
Assembly and Testing
The PVC pipes and adapters were assembled using solvent weld adhensive. Brass to PVC connections required PVC solvents and epoxy to make air tight joints. Joints were left to cure for 24hrs before being pressure tested.
Three days before the contest and it was time to see if my home brew launcher would be a success.
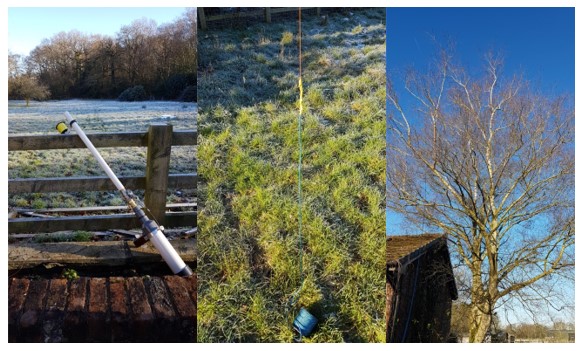
Using a car tyre compressor I put 20psi in the reservoir and with 100m reel of 10lbs breaking strain fishing line attached to the projectile I pointed the launcher skywards across open ground and pressed the trigger. I heard a pop (sounds like pulling a cork from a bottle) and watched in delight as the projectile sailed some 50ft into the air landing 150ft away. My delight was short lived when I saw the line had snapped at the end of the barrel.
Changing to 30lbs breaking strain fishing line I repeated the test, this time the line stayed attached. Practice over, it was time to use it on a tree. I repressurized the reservoir, aimed above the top of the chosen tree, and fired. To my relief the projectile gracefully sailed over the top towing a helical coil of line and descended to a few feet above the ground. I attached the end of a 50m reel of 4mm dia. rope and pulled back the fishing line. I now had a loop of rope running over a branch 12m high.
Antennas
With the loop in the tree I was able to hoist (and lower) my antenna. With this arrangement various antennas can be used e.g. end fed sloper, inverted vee, delta loop.
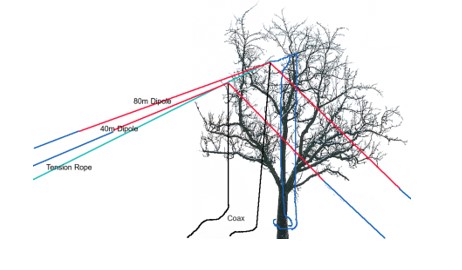
For the RSGB AFS contest I used 40m and 80m inverted vee half wave dipoles mounted as shown. Note the use of an additional tension rope to separate and pull the dipoles clear of the tree.
Conclusion
This article is written solely for amateur radio interest only. The author provides the information in good faith and takes no responsibility for errors therein. Anyone considering building an air launcher must take full responsibility to avail themselves with good engineering knowledge and ensure safety standards are met. Compliance with the law is mandatory.
My design and manufacture process was evolutionary. Selection of a suitable air valve and making the reservoir airtight took some time to get right. As did choosing and mounting the fishing line so that it does not snag in use.
Finally, the dipoles worked extremely well each with an SWR of less than 1.5. In the four hours of the RSGB AFS SSB contest 250 contacts were made with some excellent 5,9+ reports and very low reception noise levels.
Stay safe and keep within the law!